Showing posts with label travel checklist. Show all posts

Monday, September 7, 2015

Travel Checklist

My bible study barkada is going on our first international trip together and I am ultra mega over super duper excited that we only have 18 days to go! Aside from the trip itself, I'm also as excited to pack and if you're like me, you're as excited to make a checklist! I decided to make my list today with Evernote (love love love this app) and I found myself constantly cheating switching from my checklist last year for our Japan trip.


I created a new notebook and started listing what I think I need, then caught myself double checking with another list to check if I missed anything. Then I thought, what if I just copy and paste this list? Well I didn't because there were things in my Japan list that didn't need to be in this year's list. So, I decided to make my own generic check list with the flexibility to be customized to wherever you're traveling for the season.


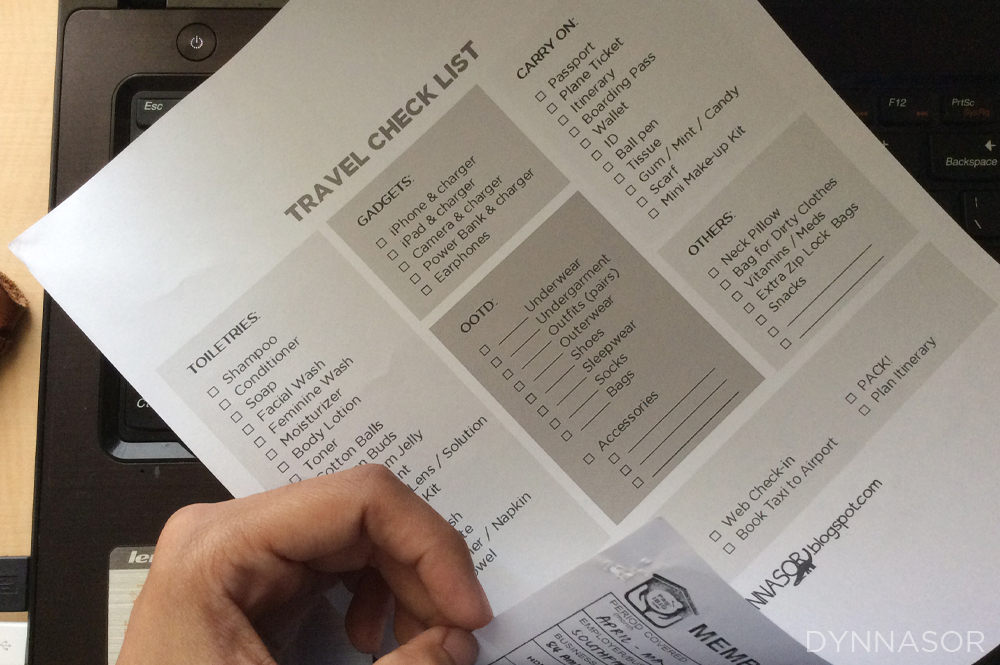
The photo above is not in black and white for effect. The more neutral it is, the more it works for me, design wise. Okay, I made this thinking about what I would bring to any trip and I divided it into 5 categories:
  1. Toiletries (and tbh I'm a bit surprised that it has the most number of items haha)
  2. Gadgets
  3. OOTD aka everything I'll wear
  4. Carry on bag
  5. Others
I also realized that aside from making a "To Bring" list, I also always make/have another note (still in Evernote) for "To Do" so I added a last category which isn't actually something you'll bring, but some last minute stuff to do before going to the airport.

You may have totally different needs from mine but I think that these are pretty general, at the very least. I know every trip is different and the category that changes most is the OOTD. I put a blank space (baby, and I'll write your name...Swiftie in the houuusseee) so I can indicate how many of every item I need to bring. This will depend mostly on one's length of stay in a particular destination. Accessories will also vary, say, if you're on a summer trip versus a spring or winter trip. Since those are totally flexible, I left those completely blank, to be filled up once the template is printed.

Now here's how to use the template and how to customize it to your trip. First, print your template. I used scratch paper, of course.

This is a list for when you pack, you don't forget anything, yes? But what if you're like me, who's overly excited and who makes a list 3 weeks before the trip? I'm guessing you will have some stuff you don't have on hand yet and will still have to buy...those items, I highlight.


By doing this, I wouldn't have to make another list for "Things To Buy." What I plan to do is take a photo of this list before I drop by the grocery so I'll just have to refer to it when I go shopping.

Next is I fill up the blank spaces:


We are staying for 4 days and 3 nights. Since Singapore weather is a bit like ours, I just need to bring sunglasses. If I were to go to the beach, I would just input swimsuits under accesssories. If I were to go to an even colder place, I would add scarves or bonnets under that category. If I feel like dressing up more, I'd add belts, rings, or bangles (but the dressing up more part rarely happens haha)

Since we are staying at a hostel for this trip, I thought I'd bring a bathrobe (hello, shared bathroom) and utensils (though I'm still contemplating on this).


There you have it. A general slash customizable check list for your next travel. If you want a copy of this, you can download a PDF version here. Or save the image below as JPEG:

I would appreciate your feedback if ever you'll be using this Travel Checklist. Thank you!

Now, Singapore, here I come!!! Again!!! For the nth time!! Hahahaha

Sunday, November 2, 2014

DIY Notebook Cover


I have a road trip coming up in 6 days and I’m excited to make a checklist. Although I always have a notebook where I jot down all of my notes and thoughts, mostly work-related, I want to have a separate tickler for travel.

I have tons of unused notebooks. Most of them pretty – sometimes too pretty. And since travel ticklers are bound to be tossed around and be overused, I was half-hearted about using the pretty ones. Being affiliated with a school, we get a lot of freebies from our publishers – from umbrellas to appliances, from desk calendars to, yes, notebooks!

Being promotional materials, they of course always have that year’s campaign material on the cover AND inside cover, plus several pages of marketing on the first few (many, actually) pages, and even some at the back. I just wanted to cover this up and for it suit me – have it in a design and size I like, but cheap enough to throw into my travel purse or backpack.


I ripped off all the pages with marketing material and then proceeded to covering it. You can use wrapping paper, burlap, maybe even an old map (perfect for traveling theme) or anything you like but I wanted the recycled vibe so I used the yellow pages from our directory.

I wanted to use spray adhesive but still couldn’t source one (I already tried National Bookstore and Ace Hardware) so I just used glue stick. I opt for glue stick over white glue because they give a nicer finish since glue tends to make paper crumple (kulubot is the better term). Just cover it like you would any other book. I just made sure to cover the inside cover as well since I want to conceal the marketing material printed on it too.


You’ll then have a completely covered flap. Just cut off excess paper (I cringed a little before I cut the yummy burger) then completely cover it.


And then tadaaaa, you’ll have a pretty covered notebook…NOT. The green at the side ruined it and crashed it to pieces. Okay, OA. Haha but I really didn't like it :(


Although it was going to be a tedious job, if there’s a will, there’s a way - I grabbed my trusty Sharpie and shaded away. I started by drawing a line to cover the division where the yellow paper ended, then filling all the “easy” gaps, then shaded under the actual rings. This isn’t the most convenient step of this project but it was the one thing bringing me to the end and it was worth it.


I know I’m showing the inside flap in the photos but it’s the same process anyway. Wasn’t able to capture the outside (hehe). And you guessed it right, you will do this process 4 times – 2 for the outside front and back, and another 2 for the inside.

And then you’ll have a brand new notebook! Yay! Here are before and after photos of the front and back:


Here's also the before and after of the inside covers. Notice that I removed the first and last pages with marketing material. And I really like that I was able to fully and neatly cover the whole inside flap.

Some details, and welcome to the brands/companies seen in the post (haha).


Now off to do my road trip checklist. I’m happy that I can bring this and not worry about keeping it pretty. It’s bound to be an all-around scratch or doodle paper anyway so I'm really happy that I didn't spend anything for this, just love haha :)